The skincare industry makes this more complicated than it needs to be. Twelve-step routines. Serums that cost more than groceries. Ingredients lists that read like chemistry textbooks. Most of it is unnecessary — and some of it actively damages skin that was doing just fine before the intervention.
A natural skincare routine doesn’t mean primitive or ineffective. It means using ingredients that work with the skin’s biology rather than against it. The basics — cleanse, treat, moisturize, protect — are the same regardless of what’s in the products. Here’s how to build a complete natural routine at home for every skin type, using ingredients that are affordable, accessible, and actually proven to work.
Before You Start: Know Your Skin Type
The routine that works for oily, acne-prone skin will make dry skin worse, and vice versa. Getting this right first saves a lot of trial and error.
Dry skin: feels tight after washing, rarely looks shiny, small pores, prone to flaking and early fine lines
Oily skin: looks shiny within an hour of washing, enlarged pores, prone to blackheads and breakouts, makeup slides off
Combination skin: oily in the T-zone (forehead, nose, chin), normal or dry on cheeks — the most common type
Sensitive skin: reacts easily to new products, prone to redness and irritation, may have underlying conditions like rosacea or eczema
Normal skin: balanced, not particularly oily or dry, minimal breakouts, small pores — lucky
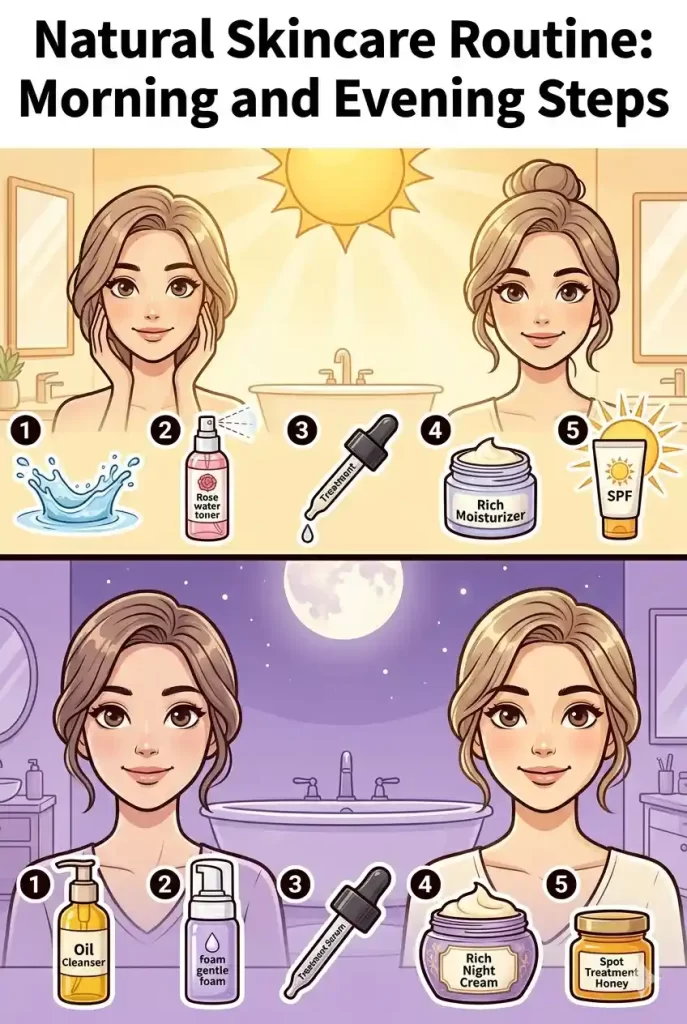
The Natural Skincare Routine: Morning Steps
Step 1 — Gentle Cleanse
Morning cleansing removes sweat, oil, and any products applied overnight. For dry and sensitive skin, rinse with lukewarm water only — no cleanser needed in the morning. For oily and combination skin, use a mild gel or foam cleanser with natural ingredients like tea tree, green tea extract, or aloe. The rule that applies to everyone: lukewarm water only. Hot water strips the lipid barrier every time.
Step 2 — Toner (Optional but Useful)
A natural toner rebalances the skin’s pH after cleansing and preps it to absorb the next step better. Rose water is the most universally suitable — calming, hydrating, and appropriate for every skin type. Green tea toner works well for oily and acne-prone skin. Apply with a cotton pad or press directly into skin with clean hands. Skip this step if your skin is very sensitive or currently reactive.
Step 3 — Treatment (Targeted for Your Skin Type)
This is where you address your specific skin concern. For acne: diluted tea tree oil (1 part tea tree to 9 parts carrier oil) applied only to active breakouts. For dark spots: vitamin C serum or a few drops of rosehip oil. For dry skin: a drop of facial oil like argan or jojoba pressed into slightly damp skin. For oily skin: niacinamide — either a few drops of niacinamide serum or a product containing at least 5%. Apply before moisturizer.
Step 4 — Moisturizer
Every skin type needs moisture — including oily skin. The difference is in the texture. Dry skin benefits from richer creams with shea butter, aloe, or plant oils. Oily skin does better with lightweight gel moisturizers or aloe vera gel on its own. Combination skin gets the richer version on cheeks and a lighter touch on the T-zone. Apply to slightly damp skin — within 60 seconds of toner or rinsing — to seal in hydration before it evaporates.
Step 5 — SPF (Non-Negotiable)
Sun protection is the single most effective anti-aging, anti-dark-spot, anti-damage step in any skincare routine. Natural zinc oxide SPF is the most skin-friendly option — it sits on top of skin rather than being absorbed, and it works for sensitive, acne-prone, and reactive skin types. Minimum SPF 30, applied as the last step every morning, rain or shine. Every other step in your routine is significantly less effective without this one.
The Natural Skincare Routine: Evening Steps
The evening routine does most of the heavy lifting. Skin repairs itself overnight, which means the ingredients you apply at night have more time to work and no UV exposure to fight.
Step 1 — Double Cleanse
Double cleansing is worth doing every evening, especially if you wore SPF or any makeup. First cleanse with an oil — coconut oil, jojoba, or an oil cleanser — massaged into dry skin to dissolve SPF and makeup. Rinse. Second cleanse with your regular gentle cleanser and water. This leaves skin properly clean without over-stripping. One cleanse rarely removes SPF fully. Two cleanse without the aggressive squeaky-clean feeling of stronger formulas.
Step 2 — Exfoliate (2 to 3 Times a Week Only)
Natural exfoliation options: raw honey massaged in gentle circles for 60 seconds acts as a gentle enzymatic exfoliant. Oat flour mixed with water creates a mild physical scrub that’s safe for sensitive skin. For more effective chemical exfoliation, diluted apple cider vinegar applied with a cotton pad and rinsed after 5 minutes provides mild AHA action. Never exfoliate every day — it breaks down the skin barrier faster than anything else.
Step 3 — Treatment Serum or Oil
Evening is when you use your most active natural treatments. Rosehip oil for dark spots and anti-aging — 2 to 3 drops pressed into skin. Bakuchiol (natural retinol alternative from the babchi plant) for cell turnover without the irritation of synthetic retinoids. Turmeric paste for acne-prone skin on active spots. Sea buckthorn oil for dry or damaged skin. Apply while skin is still slightly damp from toner.
Step 4 — Rich Moisturizer or Facial Oil
Go richer at night than in the morning. Shea butter is one of the most effective natural overnight moisturizers — it contains fatty acids that mirror the skin’s own lipids. Aloe vera gel layered under a thin facial oil works well for oily or acne-prone skin that still needs overnight hydration. Avocado oil is particularly good for mature or very dry skin — its fatty acid profile closely matches sebum.
Step 5 — Slug or Spot Treat
For very dry or damaged skin: finish with a thin layer of petrolatum (slugging) to seal everything in overnight. For acne-prone skin: apply a thin layer of raw honey to active spots — it’s antimicrobial and supports healing without clogging pores. For dark spots: a drop of pure aloe vera gel directly on spots as the final step. These targeted overnight treatments work while you sleep and rinse off in the morning cleanse.
Natural Skincare Routine by Skin Type — Quick Reference
For Acne-Prone Skin: Cleanser with tea tree or salicylic acid from willow bark. Niacinamide as treatment. Oil-free aloe gel moisturizer. Zinc oxide SPF. Evening: diluted tea tree on spots, light oil-free moisturizer, raw honey spot treatment overnight.
For Dry Skin: Water rinse in the morning, gentle cream cleanser at night. Argan or jojoba oil treatment. Rich shea butter or avocado oil moisturizer morning and night. Slug with petrolatum 3 to 4 nights per week.
For Oily Skin: Gel cleanser morning and night. Niacinamide serum. Lightweight aloe gel moisturizer. Never skip moisturizer — dehydrated oily skin overproduces oil to compensate. Zinc SPF that doesn’t feel heavy.
For Sensitive Skin: Rose water rinse only in the morning. Fragrance-free everything. Oat-based cleanser. Aloe vera as both treatment and moisturizer. Colloidal oatmeal moisturizer for flare-ups. Patch test every new ingredient for 48 hours before applying to face.
The Rules That Apply to Every Skin Type
- Introduce one new product at a time — wait 2 weeks before adding another
- Patch test on the inner arm for 24 hours before applying anything new to your face
- Consistency matters more than perfection — a simple routine done daily beats an elaborate one done sporadically
- Less is more — a 3-step routine done consistently outperforms a 10-step routine that overwhelms the skin
- Give any new routine at least 6 to 8 weeks before evaluating whether it’s working
The Short Version
Morning: gentle cleanse, treat for your specific concern, moisturize, SPF. Evening: double cleanse, exfoliate 2 to 3 times a week, treatment serum or oil, rich moisturizer, targeted overnight treatment. Use natural ingredients suited to your skin type. Stay consistent for 6 to 8 weeks. That’s the whole routine — and it works better than most expensive alternatives.