Wanting whiter teeth while wearing braces is completely understandable — and it’s one of the more complicated dental questions to get a straight answer on. Most orthodontists say wait until the braces come off. Most whitening product manufacturers say their product is fine. Neither of those answers is entirely complete.
The honest truth sits in the middle. Some whitening methods are genuinely safe during orthodontic treatment. Others create a problem you won’t notice until the braces are removed — uneven coloration where the brackets were, which is harder to fix after the fact than most people realize. Here’s the complete guide to what works, what’s safe, and what the real risks are.
Why Teeth Whitening With Braces Is Complicated
The core problem is uneven whitening. Brackets cover a portion of each tooth. Any whitening product applied to the exposed surfaces will lighten those areas, but the covered portions stay at their original color. When the braces come off, you’re left with lighter patches around a darker center — the opposite of what you wanted.
This is not a theoretical risk. It’s a common complaint among people who whitened aggressively during orthodontic treatment. The severity depends on how much natural staining was already present and how potent the whitening method used was. Gentle, consistent maintenance methods carry much lower risk than aggressive whitening treatments.
Clear aligners (Invisalign and similar) present a different situation — since aligners are removable, whitening options are broader, though still limited compared to having no orthodontic treatment at all.
Safe Whitening Methods During Orthodontic Treatment
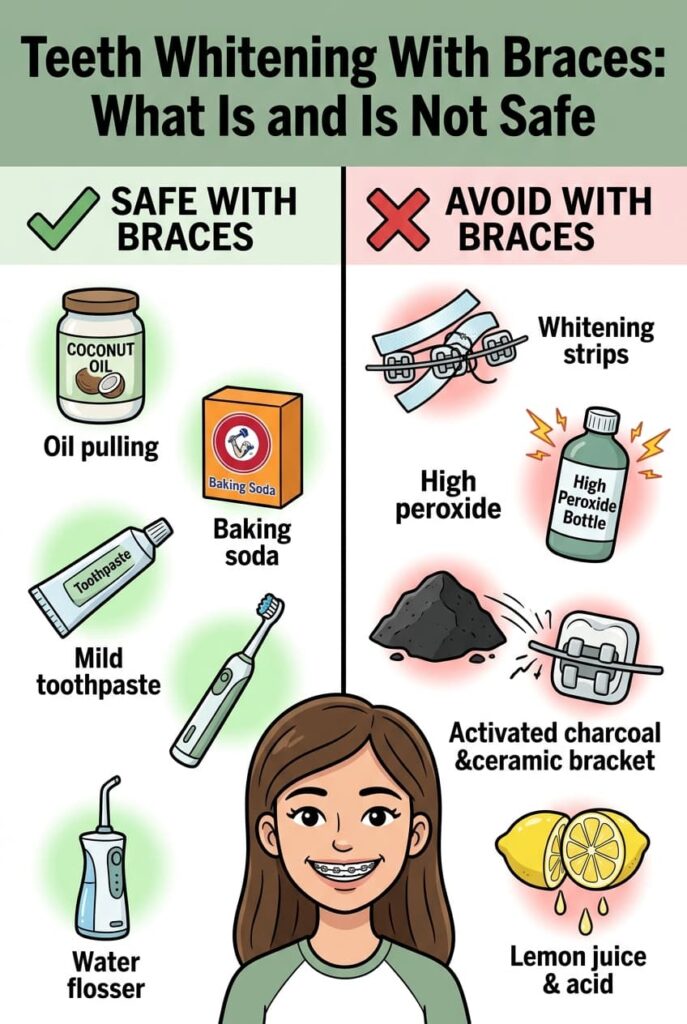
1. Oil Pulling — The Safest Option With Braces
Oil pulling is the most compatible whitening method for people with braces. It works by swishing coconut or sesame oil around the mouth for 10 to 20 minutes, which removes surface bacteria and stains through mechanical action. Crucially, it doesn’t bleach — it cleans, which means the whitening effect is gradual and even across all surfaces including the areas under brackets.
How to do it with braces: 1 tablespoon of coconut oil, swish gently for 10 to 15 minutes. Don’t swish too vigorously — aggressive swishing can put stress on bracket adhesive over time. Spit into trash, rinse, then continue with regular brushing. Daily use is safe and produces cumulative brightness improvement.
Bonus benefit: oil pulling significantly reduces the bacteria and plaque buildup that braces make harder to manage — one of the most common problems with extended orthodontic treatment.
2. Baking Soda — Gentle and Safe When Used Correctly
Baking soda’s mild abrasive action removes surface stains evenly across all exposed tooth surfaces without bleaching. Since it doesn’t change the color of tooth structure itself — just removes surface deposits — it presents minimal uneven-whitening risk.
How to use it with braces: mix a small amount of baking soda with water to make a thin paste. Apply with a soft-bristled brush, cleaning around all brackets and wires carefully. Rinse thoroughly.
Frequency with braces: once a week maximum. More frequent use is too abrasive for enamel that’s already under mechanical stress from orthodontic movement. Important: check with your orthodontist first if you have ceramic or clear brackets — baking soda’s abrasiveness can scratch ceramic bracket surfaces.
3. Whitening Toothpaste (Mild, Non-Peroxide)
Whitening toothpastes that use mild abrasives rather than peroxide are generally safe with braces. Look for products that list silica or baking soda as the whitening agent rather than hydrogen peroxide or carbamide peroxide.
The limitation: whitening toothpaste produces modest results compared to other methods. It prevents new staining from setting and removes light surface deposits, which during braces treatment is actually a realistic and useful goal. Keeping teeth from getting worse during treatment is a valid strategy.
Use twice daily as your regular toothpaste. Brush carefully around all hardware — braces require more thorough brushing technique regardless of whitening.
4. Electric Toothbrush With Proper Technique
This isn’t a whitening product but it’s one of the most effective things you can do for tooth appearance during braces. Electric toothbrushes — particularly oscillating-rotating types — remove significantly more plaque and surface stains than manual brushing, especially in the hard-to-reach areas around brackets and wires.
An electric toothbrush used consistently during orthodontic treatment keeps surface staining minimal, which means less total whitening is needed after braces are removed. Many people who experienced significant yellowing during braces were brushing inadequately around hardware rather than actually having intrinsic discoloration.
5. Water Flosser for Stain Prevention
Water flossers (oral irrigators) are not whitening tools but they’re worth including because food and bacteria trapped around brackets and under wires are a primary cause of the discoloration that develops during treatment. A water flosser used daily before brushing removes the debris that causes staining before it can set. Combined with oil pulling and a mild whitening toothpaste, it keeps teeth as clean and bright as possible throughout treatment.
For Clear Aligner Wearers: More Options Available
If you’re using Invisalign or another clear aligner system, your whitening options are broader because the aligners are removable. You can safely use:
- Whitening strips — apply when aligners are out, for the directed time, then rinse and replace aligners. Avoid peroxide concentration above 10% to reduce sensitivity
- Whitening trays — same approach, aligners out, tray in for directed time, rinse well before replacing aligners
- Whitening gel applied to the inside of your aligner trays — some orthodontists recommend this and it’s one of the most even application methods available
- Oil pulling — safe and beneficial with or without aligners
Even with aligners, avoid bleaching agents the night before a new tray set — newly moved teeth are more sensitive and more reactive to peroxide.
What to Absolutely Avoid With Metal or Ceramic Braces
- Whitening strips — they don’t conform to the contours around brackets, leave uneven coverage, and significantly increase uneven whitening risk
- High-concentration peroxide treatments — any product with carbamide or hydrogen peroxide above 3% applied to braces creates the bracket shadow problem and can also damage bracket adhesive
- Activated charcoal with ceramic or clear brackets — the abrasiveness scratches ceramic surfaces
- Lemon juice or ACV directly on teeth — the acidity combined with the mechanical stress of orthodontics is too damaging for enamel
- UV whitening kits — cannot effectively reach covered bracket areas, creating uneven results
The Best Strategy: Whitening After Braces Come Off
The most effective approach is honest but simple: focus on maintenance and stain prevention during treatment, and do your real whitening in the 2 to 4 weeks after braces are removed. At that point all tooth surfaces are exposed, any mild bracket shadow from maintenance whitening will be addressed uniformly, and you have full access to every whitening method available.
The window right after braces are removed is actually ideal for whitening. Teeth are freshly cleaned of bracket adhesive, motivation is high, and you have months of careful dental hygiene behind you. A 2 to 4 week whitening routine at that point produces much better results than anything you could safely do during treatment.
The Short Version
During metal or ceramic braces: oil pull daily, use mild whitening toothpaste, brush with an electric toothbrush, use a water flosser. Baking soda once a week maximum. Skip strips, peroxide treatments, and activated charcoal on ceramic brackets. For clear aligners: wider options including strips and trays are safe when aligners are removed. After braces: that’s when you do your real whitening routine — all methods become available and results are even.